Configure Date and Time Settings from the Remote Console

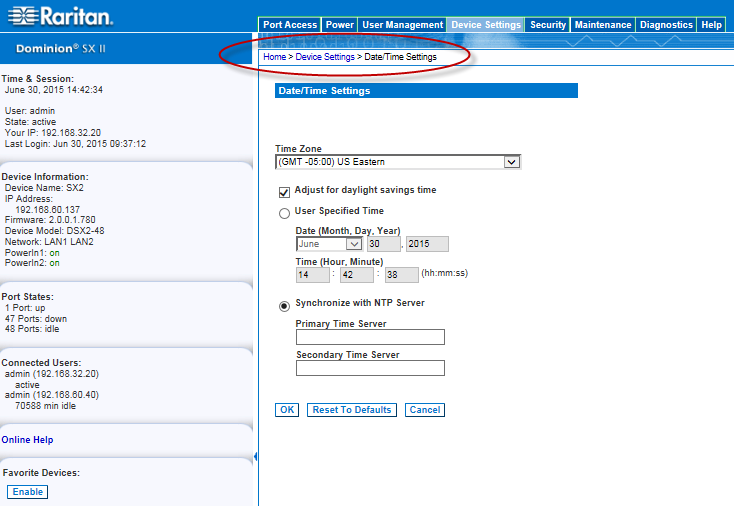
Use the Date/Time Settings page to specify the date and time for the SX II. There are two ways to do this:

  1. Choose Device Settings > Date/Time. The Date/Time Settings page opens.
  2. Choose your time zone from the Time Zone drop-down list.
  3. Adjust for daylight savings time by checking the "Adjust for daylight savings time" checkbox.
  4. Choose the method to use to set the date and time:
  5. For the Synchronize with NTP Server option:
    1. Enter the IP address of the Primary Time server.
    2. Enter the IP address of the Secondary Time server. Optional

      Note: If DHCP is selected for the Network Settings on the Network page, the NTP server IP address is automatically retrieved from the DHCP server by default. Manually enter the NTP server IP address by selecting the Override DHCP checkbox.

  6. Click OK.

See Also

Administering SX II from the Remote Console

Configure Power Strips from the Remote Console

Configure and Manage Users and Groups from the Remote Console

Configure User Authentication from the Remote Console

Configure SX II Network Settings from the Remote Console

Enable Auto Script from the Remote Console for Use with TFTP or a USB Stick

Configure Device Settings from the Remote Console

Configure SNMP Agents from the Remote Console

Configure SNMP Traps from the Remote Console

Configure Event Management - Destinations

Enable SMTP Notifications from the Remote Console

Configure and Test SMTP Server Settings

Configure Modem Settings from the Remote Console

Power Supply Setup

Configure Local Port Settings from the Remote Console

Changing the Default GUI Language Setting from the Remote Console

Configure Port Logging Settings from the Remote Console

Manage Port Logging - Local Files from the Remote Console

Configure Ports from the Remote Console

Configure Security Settings from the Remote Console

Configure Maintenance Settings from the Remote Console

Configure Diagnostic Options from the Remote Console