Configuring KVM Switches

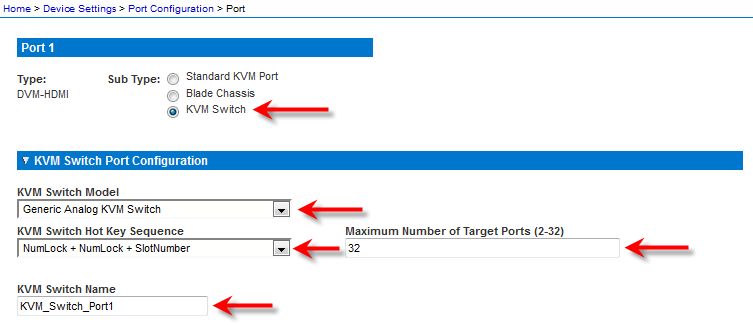
The KX III also supports use of hot key sequences to switch between targets. In addition to using hot key sequences with standard servers, KVM switching is supported by blade chassis and in tiered configurations.

Important: In order for user groups to see the KVM switch that you create, you must first create the switch and then create the group. If an existing user group needs to see the KVM switch you are creating, you must recreate the user group.

  1. Choose Device Settings > Port Configuration. The Port Configuration page opens.
  2. Click the Port Name of the target server you want to rename. The Port Page opens.
  3. Select KVM Switch.
  4. Select the KVM Switch Model.

    Note: Only one switch will appear in the drop-down.

  5. Select the KVM Switch Hot Key Sequence.
  6. Enter the Maximum Number of Target Ports (2-32).
  7. In the KVM Switch Name field, enter the name you want to use to refer to this port connection.

  8. Activate the targets that the KVM switch hot key sequence will be applied to.

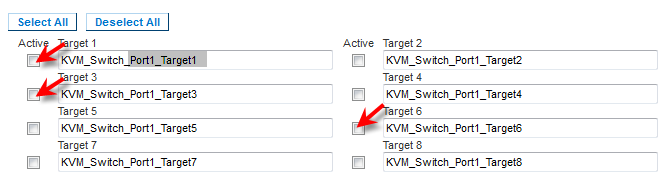
    Indicate that the KVM switch ports have targets attached by selecting ‘Active’ for each of the ports. Use Select All and Deselect All to select and deselect the Active checkboxes accordingly.

    Change the port names as need.

  9. In the KVM Managed Links section of the page, you are able to configure the connection to a web browser interface, if one is available.
    1. Select Active to activate the link once it is entered.

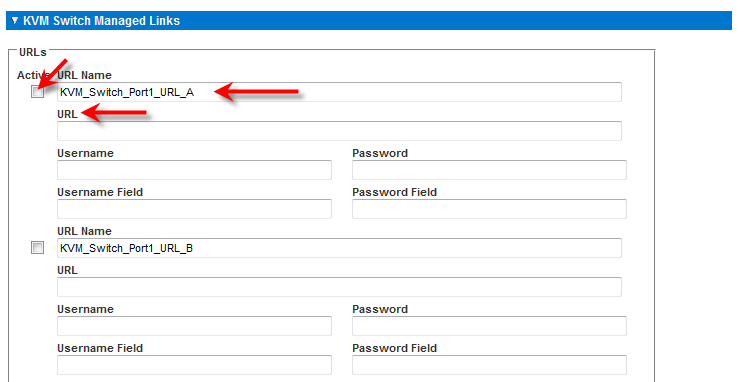
      Leave the checkbox deselected to keep the link inactive.

      You can enter information into the link fields and save without activating the links.

      Once Active is selected, the URL field is required.

      The username, password, username field and password field are optional depending on whether single sign-on is desired or not.

    2. URL Name - Enter the URL to the interface.
    3. Username - Enter the username used to access the interface.
    4. Password - Enter the password used to access the interface.
    5. Username Field - Enter the username parameter that will be used in the URL. For example username=admin, where username is the username field.
    6. Password Field - Enter the password parameter that will be used in the URL. For example password=raritan, where password is the password field.

  10. Click OK.
  1. Choose Device Settings > Port Configuration. The Port Configuration page opens.
  2. Click the Port Name of the target server you want to deactivate. The Port Page opens.
  3. Deselect the Active checkbox next to the KVM switch target port or URL to deactivate them.
  4. Click OK.

See Also

Configuring Ports

Access the Port Configuration Page

Port Configuration Page

Configuring Standard Target Servers

Configuring CIM Ports

Configuring Rack PDU (Power Strip) Targets

Configuring Blade Chassis

Configuring USB Profiles (Port Page)

Configuring KX III Local Port Settings