Using IP access control, you control access to your KX III. Note that IP access control restricts traffic of any kind from accessing the KX III, so NTP servers, RADIUS hosts, DNS hosts and so on must be granted access to the KX III.
By setting a global Access Control List (ACL) you are ensuring that your device does not respond to packets being sent from disallowed IP addresses. The IP access control is global, affecting the KX III as a whole, but you can also control access to your device at the group level. See Group-Based IP ACL (Access Control List) for more information about group-level control.
Important: IP address 127.0.0.1 is used by the KX III local port. When creating an IP Access Control list, 127.0.0.1 should not be within the range of IP addresses that are blocked or you will not have access to the KX III local port.
To use IP access control:
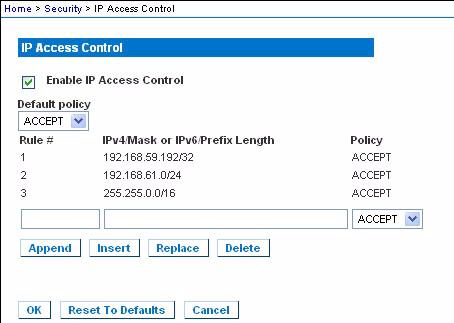
Select Security > IP Access Control to open the IP Access Control page.
Select the Enable IP Access Control checkbox and the remaining fields on the page.
Choose the Default Policy. This is the action taken for IP addresses that are not within the ranges you specify.
Accept - IP addresses are allowed access to the KX III device.
Drop - IP addresses are denied access to the KX III device.
To add (append) rules:
Type the IP address and subnet mask in the IPv4/Mask or IPv6/Prefix Length field.
Note: The IP address should be entered using CIDR (Classless Inter-Domain Routing notation, in which the first 24 bits are used as a network address).
Choose the Policy from the drop-down list.
Click Append. The rule is added to the bottom of the rules list.
To insert a rule:
Type a rule #. A rule # is required when using the Insert command.
Type the IP address and subnet mask in the IPv4/Mask or IPv6/Prefix Length field.
Choose the Policy from the drop-down list.
Click Insert. If the rule # you just typed equals an existing rule #, the new rule is placed ahead of the exiting rule and all rules are moved down in the list.
Tip: The rule numbers allow you to have more control over the order in which the rules are created.
To replace a rule:
Specify the rule # you want to replace.
Type the IP address and subnet mask in the IPv4/Mask or IPv6/Prefix Length field.
Choose the Policy from the drop-down list.
Click Replace. Your new rule replaces the original rule with the same rule #.
To delete a rule:
Specify the rule # you want to delete.
Click Delete.
You are prompted to confirm the deletion. Click OK.