Port configuration allows administrators to define KVM and serial port settings in order to communicate with remote target devices. This section contains information on the following, which are all a part of the port configuration process:
Naming KVM targets and serial targets (including valid special characters that can be used)
Creating power associations for KVM and serial targets
Configuring KVM target server settings
Configuring serial port settings
Name KVM and Serial Targets
Note that the KVM and serial target names are defined on different Port pages (either a KVM or serial Port page) but the steps involved are the same for both. The only variation is selecting a KVM target or serial target from the Port Configuration page to connect to the appropriate page.
To name KVM target servers and serial targets:
Connect all of the KVM target servers and serial targets if you have not already done so (as described in Step 1: Connect the Equipment).
Using the Dominion KSX Local Console, select Device Settings > Port Configuration. The Port Configuration page opens.
Click the name of the KVM target server or serial target you want to name. The Port page opens. The fields on the Port page will vary for KVM and serial targets.
Assign a name to identify the server or serial target connected to that port. The name can be up to 32 characters; alphanumeric and special characters are allowed.
Click OK.
Valid Special Characters for Target Names
Character
Description
Character
Description
!
Exclamation point
;
Semi-colon
"
Double quote
=
Equal sign
#
Pound sign
>
Greater than sign
$
Dollar sign
?
Question mark
%
Percent sign
@
At sign
&
Ampersand
[
Left bracket
(
Left parenthesis
\
Backward slash
)
Right parenthesis
]
Right bracket
*
Asterisk
^
Caret
+
Plus sign
_
Underscore
,
Comma
`
Grave accent
-
Dash
{
Left brace
.
Period
|
Pipe sign
/
Forward slash
}
Right brace
<
Less than sign
~
Tilde
:
Colon
Associate KVM and Serial Target Servers to Outlets
A server can have up to four power plugs and you can associate a different power strip with each. From the Port page, you can define those associations so that you can power on, power off, and power cycle the server.
The KVM and serial Port pages are different from each other with the exception of the Name and Port Association sections. Since the Power Association sections are the same, the steps below apply to both KVM and serial target servers.
To make power associations (associate power strip outlets to target servers):
Note: When a power strip is associated to a target server (port), the outlet name is replaced by the target server name (even if you assigned another name to the outlet).
Choose the power strip from the Power Strip Name drop-down list.
For that power strip, choose the outlet from the Outlet Name drop-down list.
Repeat steps 1 and 2 for all desired power associations.
Click OK. A confirmation message is displayed.
To remove a power strip association:
Select the appropriate power strip from the Power Strip Name drop-down list.
For that power strip, select the appropriate outlet from the Outlet Name drop-down list.
From the Outlet Name drop-down list, select None.
Click OK. The power strip/outlet association is removed and a confirmation message is displayed.
Configure KVM Target Server Settings
To configure a KVM port:
Choose Device Settings > Port Configuration. The Port Configuration page opens.
Click a KVM port to configure. The Port page opens.
Enter or edit the name for the port and make or remove power associations as needed. Click OK to apply the settings.
If you are using VM-CIMs, the following options will be available:
Check the Absolute mouse scaling for MAC server option if you are using the D2CIM-VUSB CIM for a Mac target server.
Check the Use Full Speed for Virtual Media CIM option for use the high speed BIOS devices.
Note: For SUSE 9.2 KVM target servers, please enable (check) the Use Full Speed for Virtual Media CIM option for those target server ports. SUSE 9.2 does not work with the Virtual Media CIM when high speed is negotiated.
Click OK.
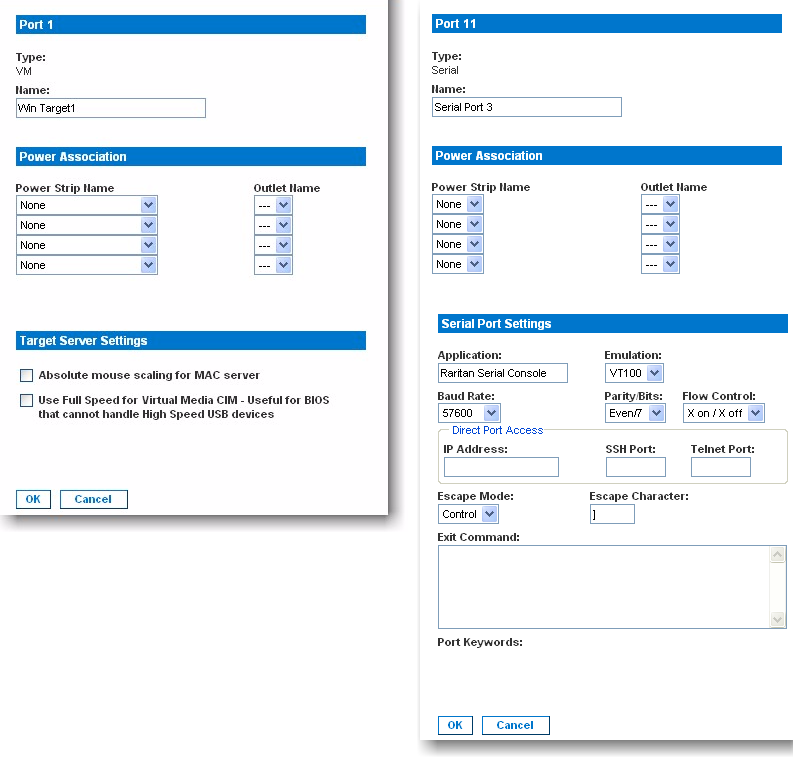
Configure Serial Port Settings
To configure a serial port:
Choose Device Settings > Port Configuration. The Port Configuration page opens.
Click a serial port to configure. The Port page opens. The Application field is read-only.
Select the terminal emulation type from the Emulation drop-down menu. The choices are:
VT100
Note: VT100 is only supported by the Local Console port. Other options may not be recognized.
VT220
VT320
ANSI
Make sure the port values match the target system's serial port configuration:
Select the baud rate from the Baud Rate drop-down menu. The choices are:
9600
19200
28200
38400
57600
115200
Select the parity bits from the Parity Bits drop-down menu:
None/8
Odd/7
Even/7
Select the flow control from the Flow Control drop-down menu.
Hardware
X on/X off
Note: From a user's perspective, data loss may be observed when SW flow control is used at very high data rates. If so, you should switch to HW flow control (on both KSX and the target server).
If you plan to use Direct Port Access (DPA), you must enter one of the following:
The DPA IP Address.
The port number, such as 7700, in the DPA SSH TCP Port field.
The port number, such as 8800, in the DPA Telnet TCP Port field.
The escape mode is set to the default of Control.
Type the Escape Character. The default is ] (closed bracket ).
Type up to 10 commands in the Exit Command field. This is the command that will be sent to your system when a port disconnection occurs, (such as logout). For example, Command1;Command2 or Command1#<timeinterval>;Command#2<timeinterval>;….
Click OK.
Note: See Port Keywords for information on the Port Keywords section of a serial Port page.