Add a User

When you add a user to CC-SG, you must specify a user group to give the user the access privileges assigned to the user group.

user profile-new local user

  1. In the Users tab, select the group to which you want to add a user.
  2. Choose Users > User Manager > Add User.
  3. In the Username field, type the user name of the user you want to add. This name is used to log in to CC-SG. See Naming Conventions for details on CC-SG's rules for name lengths.
  4. In the Full Name field, type the user's full first and last name. See Naming Conventions for details on CC-SG's rules for name lengths.
  5. Select the Login Enabled checkbox if you want the user to be able to log in to CC-SG.
  6. Select the Check Remote Authentication checkbox only if you want the user to be authenticated by an external server, such as TACACS+, RADIUS, LDAP, or AD. If you are using remote authentication, a password is not required and the New Password and Retype New Password fields will be disabled.
  7. In the New Password and Retype New Password fields, type the password that the user will use to log in to CC-SG.

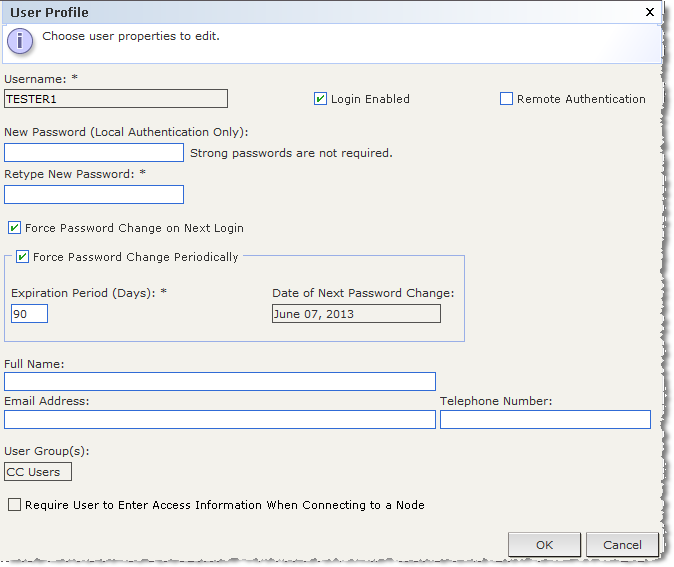
    Note: See Naming Conventions for details on CC-SG's rules for name lengths.

    If strong passwords are enabled, the password entered must conform to the established rules. The information bar at the top of the screen will display messages to assist with the password requirements. See Advanced Administration for details on strong passwords.

  8. Select the Force Password Change on Next Login checkbox to force the user to change the assigned password the next time they log in.
  9. Select the Force Password Change Periodically checkbox to specify how often the user will be forced to change their password.
  10. If selected, in the Expiration Period (Days) field, type the number of days that the user will be able to use the same password before being forced to change it.
  11. In the Email address field, type the user's email address. This will be used to send the user notifications.
  12. In the Telephone Number field, type the user's telephone number.
  13. Click the User Groups drop-down menu and select the group to which the user will be added.
  14. When you are done configuring this user, click Apply to add this user and create another one, or click OK to add the user without creating more. The users you create appear in the Users tab, nested underneath the user groups to which they belong.

See Also

Adding, Editing, and Deleting Users

Edit a User

Delete a User